The Nest brought the idea of smart, connected home thermostats into the mainstream, and it somewhat eclipsed many other equally good or even better thermostats out there. However, Nest lacks support for Apple’s HomeKit ecosystem, and since the company is now owned by Apple’s rival, Google, it’s not likely we’ll see it joining the HomeKit club any time soon. HomeKit has opened up the field for more smart thermostats, and even created opportunities for some new entries into the field, including iDevices’ new Thermostat ($149), a relatively inexpensive Wi-Fi thermostat that can drop in relatively easily to replace most electronic home thermostats while offering monitoring, control, and scheduling via HomeKit.
Installation of the iDevices Thermostat is relatively easy, providing your have the necessary wiring in place. Like almost every other electronic thermostat, you’ll need a “C” wire coming from your furnace to provide the 24VAC required to power the thermostat itself. As an aside, it’s worth noting that while some thermostats like the Nest don’t require this additional wire, those thermostats use somewhat unorthodox methods to run without that common power line, which may not be ideal for all types of heating systems — many professional installers recommend that a proper “C” wire always be used. Note that it may be possible to install the iDevices Thermostat without a “C” wire by providing your own 24VAC power source; although this configuration does not appear to be officially supported by iDevices, it appeared to work without any issues in our own testing.

Like most electronic thermostats, the iDevices package provides a backplate for mounting the thermostat onto your wall and connecting the wires, which the main unit itself then clips onto. Installation doesn’t require much more than lining up the appropriate wires to the appropriate terminals, and if you’re already using an electronic thermostat, you’ll likely find that it’s really just a matter of noting where the wires are connected on the old thermostat and connecting them to the same letter-coded slots on the new backplate.
iDevices Thermostat is compatible with a wide variety of HVAC systems, including one- and two-stage heating, cooling, and heat pump systems with auxiliary or emergency heat, as well as fan control, but don’t let the number of wire terminals intimidate you, as it works just fine with even the most basic three-wire heating-only systems — two for controlling the heating relay and a common “C” wire for supplying power to the electronics in the thermostat itself.

Once the backplate is hooked up, the main Thermostat unit simply clips onto the front and should immediately power up into initial setup mode. As with the iDevices Switch, the company’s own iDevices Connected app is used to perform the initial setup — a process that remains virtually identical to every other HomeKit devices we’ve looked at; the app should detect the Thermostat, transfer your iPhone’s Wi-Fi configuration to it, and then pair it with HomeKit by scanning or entering the unique HomeKit accessory code. One notable difference with iDevices Thermostat is that you won’t find the HomeKit accessory code on a sticker on the device or in the instruction manual — instead it appears on the unit’s LCD screen at the appropriate point during the setup process. Scanning the code with your iPhone camera works just as easily as scanning from a card or sticker, however.

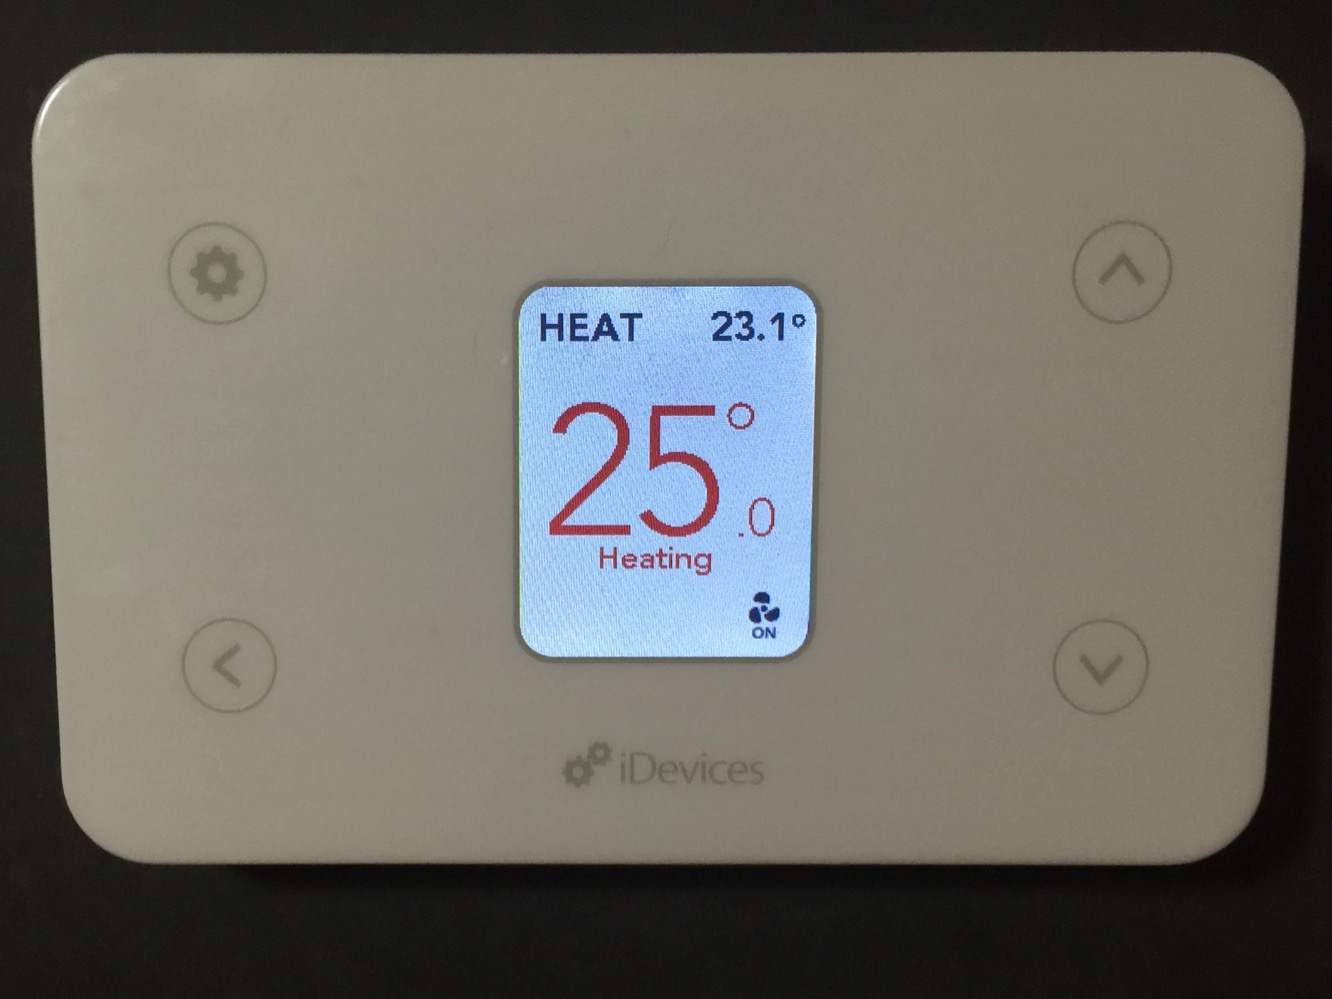
The iDevices Thermostat can be operated from the front panel in a manner similar to most other electronic thermostats. The LCD display by default shows the mode the thermostat is set to — HEAT, COOL, AUTO, EMERGENCY HEAT, or OFF — and the current room temperature at the top, while a fan indicator is shown in the bottom right corner when the fan is on. When the thermostat is in any mode other than OFF, large numbers in the middle of the display show the current temperature setting, color-coded red when the heat is on, blue when the A/C is engaged, and black otherwise.
Four touch-sensitive buttons are also found on the face of the panel, with the two on the right providing for manual temperature adjustments in 0.1-degree increments, and the two on the left used to navigate the on-device menus for adjusting heating/cooling modes and accessing the setup menus. Adjusting the temperature manually was doable, but a bit cumbersome, as the increments are so small and multiple taps are required — there’s no ability to simply hold down the button to adjust the temperature setting more quickly.
The front panel buttons can also be disabled or “locked,” but this appears designed to simply prevent accidental changing of the temperature or keep small children from playing with the thermostat, rather than as a security feature — holding down the Settings button for five seconds disabled the lock feature.

Although the front panel options provide everything needed for basic operation, most users will prefer to configure and adjust the thermostat from their iOS device, since this is generally the point of having a Wi-Fi thermostat. The iDevices Connected app provides access to all of the same control and configuration options that you can access from the console, as well as a few more advanced tuning options such as calibrating the temperature offset and span and setting the deadband temperature range between heating and cooling for “Auto” mode. The Thermostat also offers a choice between Celsius and Fahrenheit temperature scales and the ability to monitor and alert you when it’s time to change your system’s filter.
As with the iDevices Switch and other HomeKit devices, the iDevices Thermostat can be given a name, assigned to rooms, zones, service groups, schedules and scenes. Other HomeKit apps supporting thermostats can also be used to adjust and view the basic settings such as room temperature, temperature setting, and heating/cooling mode. This allows the Thermostat to be included in schedules that can be triggered based on time of day (warming up the house a couple of hours before you get up, for instance), or included in Scenes that can be triggered either via a HomeKit app or Siri voice command (e.g. saying “Good night” to Siri can adjust the temperature downward to save energy while you’re bundled up in bed while also turning off all of your lights). Siri voice commands can also be used to reference functions on the thermostat by room or zone (“set the hallway temperature to 25 degrees” or “what is the temperature upstairs?”).