For centuries, artists and printers have been engraving metal and wood, and there is a wealth of literature dedicated to this craft. In contemporary times, advanced laser cutters and various machines are capable of etching designs into plastics, gemstones, and other difficult materials. Despite the extensive and diverse applications of engraving, you can begin your own engraving journey with just a handful of tools.
Here’s everything that you need to learn how to do engraving from the comfort of your own home. Make sure you do the proper research to find the right tools, as well as how to fully prepare for a new project.

Engraving Metal With An Engraving Tool
One of the best engraving tools to have in your arsenal would be a diode laser engraver. An alternative is a pneumatic engraver. This tool is budget-friendly and can be held comfortably in one hand, utilizing air to embed the point into the metal. Gravers are available in various tip shapes, but beginning with a square “V” cut point is a practical and versatile choice. It makes it easier for you to maintain control while you’re practicing.
If this is your first time engraving, it would be a good idea to have some metal to practice on first. Work on a material that you are okay with damaging. Softer metals like copper or certain brass alloys are quicker and simpler to engrave compared to steel or other harder metals.
Preparing The Metal For Engraving
Utilize a moist cloth to wipe down the metal surface, followed by a dry cloth to eliminate any moisture. If the metal remains dirty, clean it with soapy water and then dry it off. In cases where the metal has a protective coating, as is frequently seen with brass, there is no need to strip it away. Nevertheless, since the engraving process will penetrate this coating, you will need to reapply a new finish afterward to ensure the metal’s color stays uniform.
Find A Means Of Transferring The Image
If the metal is already prepared, proceed to the next step. If you are unable to locate the specialized materials needed, look online for alternative methods to transfer an image. Keep in mind that most of these methods also necessitate some form of specialized equipment.
Apply a varnish or shellac to the section you wish to engrave, allowing it to become mostly dry and slightly tacky before proceeding. Using a soft lead pencil, sketch the design onto polyester film. Cover the drawing with Scotch tape. Firmly rub the tape with your fingernail or a burnisher, then gently peel the tape away. The design will now be transferred onto the tape. Adhere the tape to the varnished metal. Rub it down with your fingernail in the same manner, then carefully remove it.
Clamp Your Metal In Place
Secure your metal firmly. Engraving becomes significantly simpler when you utilize a clamp or vise to stop the metal from moving. You can opt for a handheld clamp that enables you to grip it with one hand for better stability; however, keep in mind that this may heighten the risk of cuts or scrapes. When employing a power tool, or a hammer and chisel that necessitates both hands, it is strongly advised to use a clamp to secure the metal to a table or another stable surface.
Cutting Into The Design
Utilize your selected tool to convert the drawing into an engraving, applying pressure on the point at an angle to remove sections of metal. For your initial attempts, aim to maintain the tool’s end at a consistent angle throughout the engraving process. Start by creating a straight line in both directions until it becomes a prominent, deep cut. Use this as a foundation to proceed with the other lines. To engrave a line with a complex shape, like a J, complete the straight part first. After this is done, transition to the more challenging non-carved section.
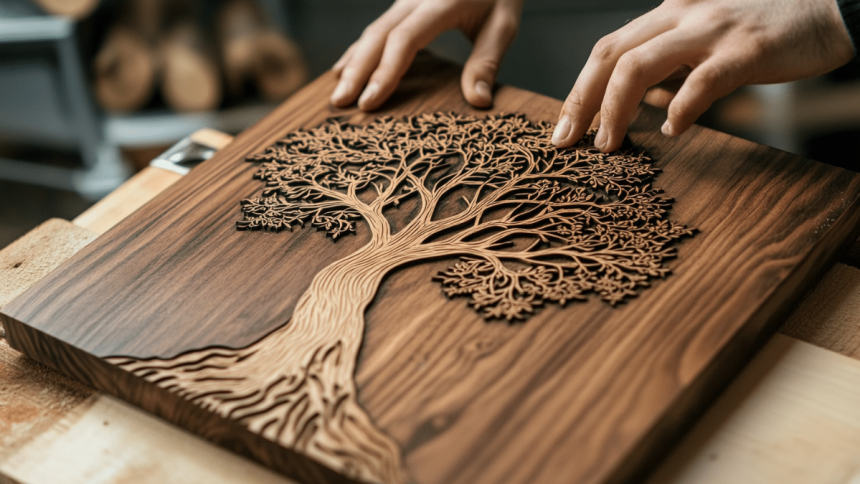
Engraving With A Power Tool
Using a power tool is a bit different from using an engraver. Nearly any dremel or router bit is capable of cutting through wood. A table router can be adjusted to maintain a consistent depth for user convenience, making it ideal for creating signs and other straightforward wood engravings. It is essential to wear eye protection when operating a rotary tool.
There is a wide variety of bits, or burs, that can be attached to your power tool to produce different cutting styles. Some of the most frequently used include bull nose bits for hollow surfaces, cylinder bits for flat surfaces, and teardrop-shaped flame bits that provide precise control over the angle.
Getting Additional Info
Engraving is a form of art that individuals engage in and refine throughout their lives. Should you be curious about new techniques, machine engraving, or practical tips for enhancing your toolset, numerous resources are at your disposal:
● Look up “engraving forums” on the internet to discover communities of engravers. If you have a particular interest, you might find a forum or subforum focused on precious metals, steel, or various other types of metal engraving.
● Look for books about engraving. A book dedicated to engraving will probably provide more in-depth information than what is available online. If you’re uncertain about which book to begin with, an engraving forum could be a helpful resource to inquire.
● Learn from local engravers. This could involve signing up for a course at a community college or locating a nearby engraving studio that offers occasional workshops. If you are committed to pursuing a career in engraving, think about providing free assistance to work as an apprentice with an engraver, or consider enrolling in a one-year engraving program.
Engraving can be a rewarding hobby as long as you take the proper steps to find the right tools. Speak to a professional in your area to help you find what you’re looking for, as well as to give you some good tips on starting the process of engraving.