Imagine a student just recorded a 20-minute presentation on their phone. The deadline is close, and they quickly hit upload. The progress bar reaches 87%, and suddenly the WiFi disconnects. The upload fails, and they have to start again.
I know it’s frustrating, and this happens to students everywhere. As video assignments become more common, EdTech platforms need a simple and reliable way to upload large videos, even with weak WiFi.

In this guide, we’ll build a mobile uploader that solves this problem, with resumable uploads, progress tracking, and automatic retry when the connection drops.
Whether you’re building a learning management system, an assignment submission portal, or any educational platform, this tutorial will help you create a smooth upload experience for students.
Key Takeaways
- Chunked uploads split large videos into smaller parts so they upload faster and more reliably.
- Resumable uploads allow students to pause and resume without losing progress
- Progress tracking shows real-time updates, making the upload process less stressful.
- Automatic retries handle connection drops, so students don’t have to re-upload.
- Mobile optimisation keeps uploads smooth even on slower devices or networks.
Before we get into how to fix it, let’s first understand what actually goes wrong when students try to upload large video files.
Why Video Uploads Fail
Most upload systems can’t handle large files or weak internet connections properly. Even a small network issue, phone lock, or WiFi drop can stop the upload completely.
When there’s no way to resume or retry automatically, students have to restart the upload, which wastes both time and data.
Here are the three main reasons why uploads often fail:
- File Size: Modern phones record in HD or 4K, which makes even a 10-minute video 1–2 GB or more. Most upload systems try to send the entire file at once, and that often fails when the file is this large.
- Network Instability: Campus WiFi is often unreliable. Students move between buildings, some areas have weak signals, and the network gets slow when many people are online, especially near deadlines. According to high-performance browser networking, even modern networks experience micro-disconnections, which can interrupt ongoing uploads.
- Timeout Issues: Most servers and browsers have time limits for uploads. If a large file takes too long to upload, the connection ends automatically, and all progress is lost. For example, browsers use the XMLHttpRequest.timeout property to automatically stop requests that exceed a set time limit.
We can solve all these problems by using chunked uploads with smart retry logic, and the best part is, we don’t have to build it from scratch. Tools like Filestack already handle these features, which makes uploads faster and more reliable.
Building Your Mobile Uploader
To get started, we’ll use Filestack, a file upload service that handles all the tricky parts like chunked uploads, automatic retries, network changes, and resumable uploads.
This means we can focus on creating a simple, frustration-free upload experience for students instead of dealing with upload errors.
Let’s start building it!
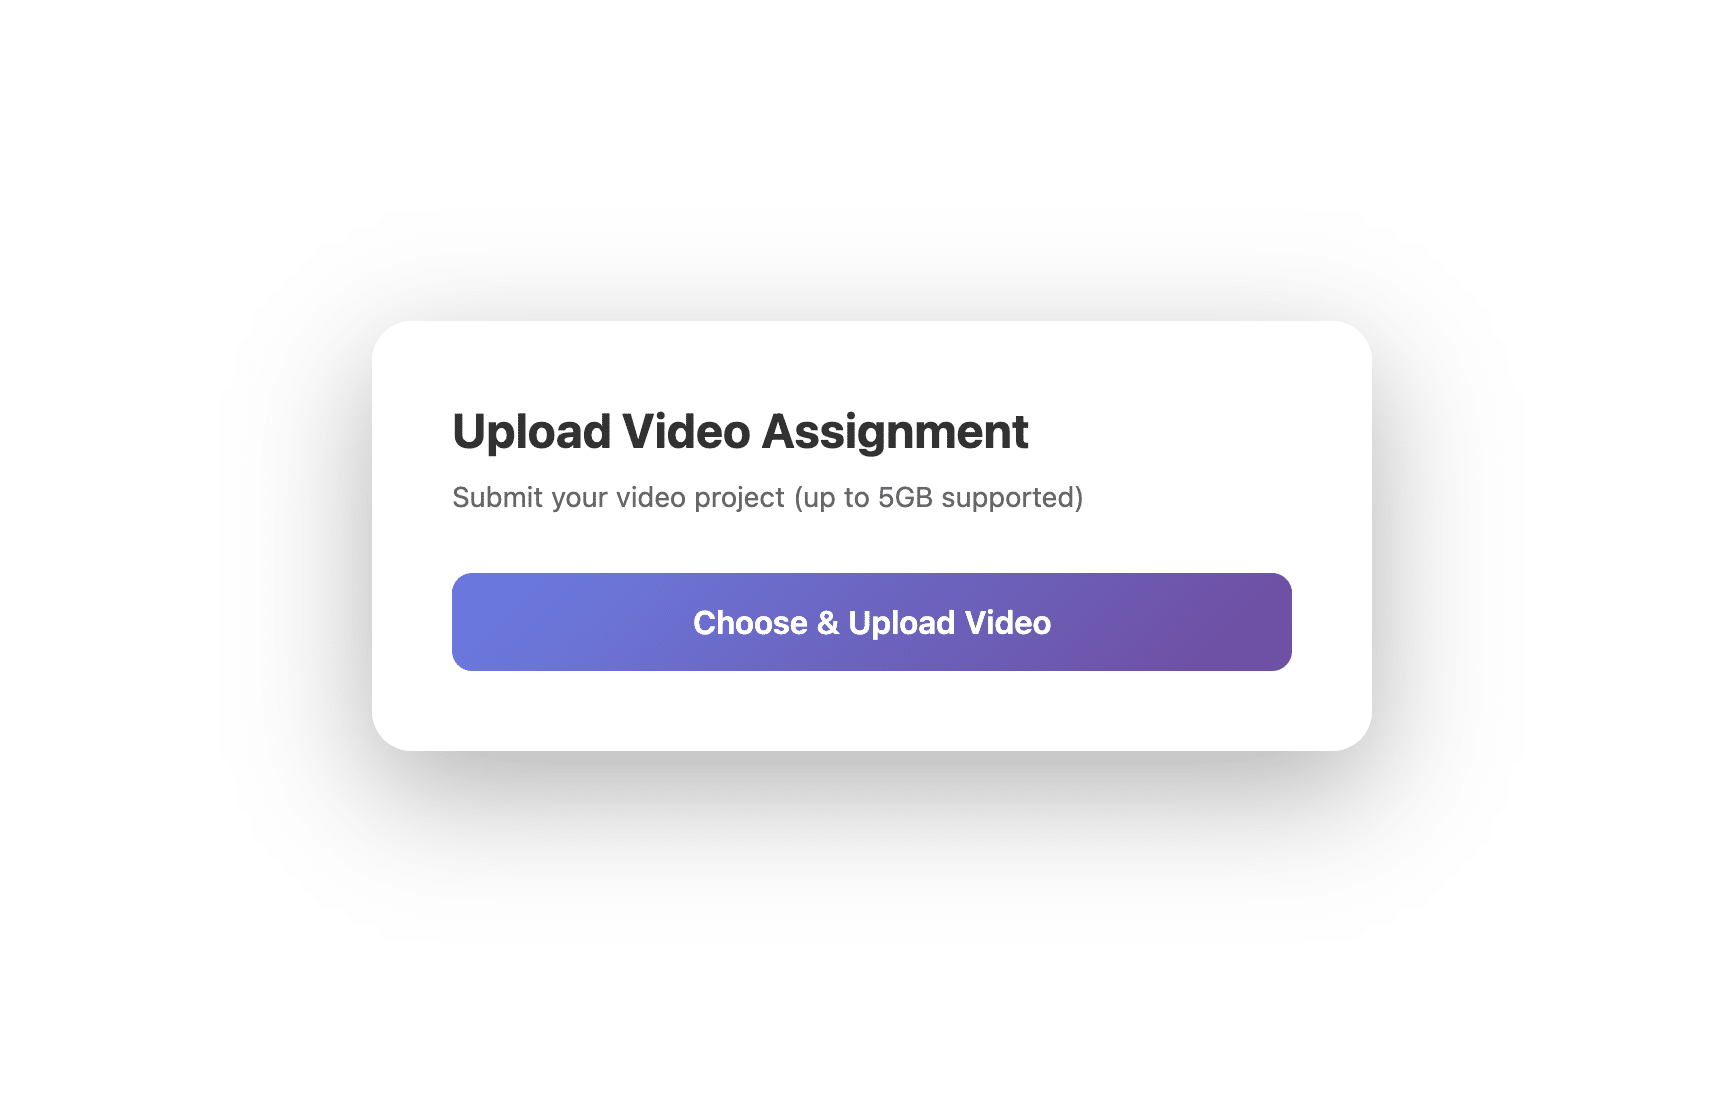
Step 1: Setting Up the HTML Interface
Let’s start by creating a simple, mobile-friendly upload interface that students can easily use on any device.
<!DOCTYPE html>
<html lang="en">
  <head>
    <meta charset="UTF-8" />
    <meta name="viewport" content="width=device-width, initial-scale=1.0" />
    <!-- Link to external CSS file for styling -->
    <link rel="stylesheet" href="style.css" />
    <title>Video Assignment Uploader</title>
  </head>
  <body>
    <div class="upload-container">
      <h1>Upload Video Assignment</h1>
      <p class="subtitle">Submit your video project (up to 5GB supported)</p>
      <button class="upload-button" id="uploadButton">
        Choose & Upload Video
      </button>
      <!-- File information (hidden until a file is selected/uploaded) -->
      <div class="file-info" id="fileInfo">
        <div class="file-name" id="fileName"></div>
        <div class="file-size" id="fileSize"></div>
      </div>
    </div>
    <!-- Custom JavaScript file that handles upload logic -->
    <script src="script.js"></script>
  </body>
</html>
Now let’s style this interface with CSS.
Here’s what it will look like:
Step 2: Integrate Filestack for Video Uploads
Now that the interface is ready, let’s connect it with Filestack.
With just a few lines of code, you can open Filestack’s upload dialog, let students select a video, and handle the upload automatically.
We’ll go step by step.
Step 2.1: Add the Filestack SDK
First, include the Filestack JavaScript SDK at the bottom of your HTML file (just before </body>):
<!-- Filestack SDK: required for file uploads -->
<script src="<https://static.filestackapi.com/filestack-js/4.x.x/filestack.min.js>"></script>
This loads the Filestack library so you can use it in your upload script.
Step 2.2: Initialise Filestack in JavaScript
Next, create a new file called script.js, and initialise your Filestack client with your API key:
// Initialise the Filestack client with your API key
const client = filestack.init("YOUR_FILESTACK_API_KEY");
This key links your uploader to your Filestack account and tells it where to store files.
Step 2.3: Configure the Upload Button
Now, let’s make the upload button actually do something.
When students tap it, Filestack’s file picker will open, letting them choose a video to upload.
// Get reference to the upload button element
const uploadButton = document.getElementById("uploadButton");
// Add a click event listener to open the Filestack picker
uploadButton.addEventListener("click", () => {
  // Configuration options for the Filestack picker
  const options = {
    accept: ["video/*"], // Allow only video file types
    maxFiles: 1, // Restrict to one file per upload
    uploadInBackground: false, // Wait for the upload to complete before closing
    onUploadDone: handleUploadSuccess, // Callback when upload finishes successfully
  };
  // Open the Filestack file picker with the given options
  client.picker(options).open();
});
Step 2.4: Handle Successful Uploads
When a video finishes uploading, we’ll show the file details and send it to the backend:
// Called when the upload completes successfully
function handleUploadSuccess(result) {
  // Get the uploaded file details (first file from the response)
  const file = result.filesUploaded[0];
  console.log("File uploaded:", file);
  // Display file information on the UI
  showFileInfo(file);
  // Send the uploaded file details to the backend server
  submitAssignment(file);
}
Step 2.5: Display File Info
Let’s update the UI to show which file was uploaded and its size:
// Displays uploaded file information (name + size) in the UI
function showFileInfo(file) {
  document.getElementById("fileName").textContent = file.filename; // Show file name
  document.getElementById("fileSize").textContent = `Size: ${
    file.size /
    (1024 * 1024)
  ).toFixed(2)} MB`; // Convert bytes to MB and show file size
    // Reveal the file info section by adding a visible class
  document.getElementById("fileInfo").classList.add("visible");
}
Step 2.6: Send the File to Your Backend
Finally, connect this to your LMS or backend system to log the submission:
// Sends uploaded file details to your backend for assignment submission
async function submitAssignment(file) {
  await fetch("/api/submit-assignment", {
    method: "POST",
    headers: { "Content-Type": "application/json" },
    body: JSON.stringify({
      studentId: "student_123", // Replace with actual student ID (from your auth system)
      assignmentId: "assignment_456", // Replace with actual assignment ID (from context)
      fileUrl: file.url, // Filestack-hosted file URL
      fileName: file.filename, // Original file name
      uploadedAt: new Date().toISOString(), // Timestamp of upload
    }),
  });
}

And that’s it, with just a few lines of code, you now have a fully functional video uploader that’s:
- Automatically chunked for large files.
- Resumable by default.
- Capable of tracking upload progress.
- Smart enough to retry failed chunks.
- Optimised for mobile devices and slower connections.
Now that your uploader is up and running, let’s take a quick look at what makes it so reliable behind the scenes.
How Filestack Works
Filestack handles all the tricky parts automatically, but it’s good to know how it works:
Smart Chunking
Instead of uploading one big file, Filestack breaks it into smaller parts (chunks).
It also adjusts chunk size automatically based on:
- Internet speed: Faster connections get bigger chunks, slower ones get smaller.
- Connection strength: If uploads keep failing, Filestack automatically reduces chunk size.
- Device performance: Mobile devices with less memory use smaller chunks to avoid crashes.
This smart behaviour happens automatically when you use the intelligent: true setting in Filestack’s upload options.
Learn more about Filestack’s intelligent ingestion here!
If you’re curious about how chunked uploads work at the protocol level, check out this guide on HTTP chunked transfer encoding.
Automatic Retry
If an upload fails halfway, Filestack doesn’t start over. It:
- Waits a few seconds.
- Retries only the failed chunk.
- Adjusts its strategy if errors keep happening.
- Updates you through built-in callbacks.
This all happens automatically; you don’t have to write any of this logic.
Resumable Uploads
Filestack uses multipart upload protocols (like S3’s multipart upload) to upload chunks in parallel.
That means:
- Several chunks are uploaded at once, which makes it faster.
- Each chunk is tracked separately.
- If your connection drops, Filestack continues from where it left off once you’re back online.
Even if a student closes the browser, the upload resumes from where it left off without losing any progress.
Fast Delivery (CDN)
After upload, Filestack automatically:
- Stores the video securely in cloud storage.
- Delivers it through a global CDN for faster playback.
- Gives you a single shareable URL for easy access.
Now that you understand how it works behind the scenes, let’s test it to make sure everything runs smoothly in real situations.
Testing Your Uploader
Here are a few things to test before deploying your uploader:
1. Large Files
Upload a 2–3 GB video to ensure the uploader handles chunking, retries, and completion correctly.
2. Network Interruptions
- Turn WiFi off mid-upload.
- Switch between Wi-Fi and mobile data.
- Simulate a slow 3G network.
3. Different Devices
Test on:
- iPhone (Safari)
- Android (Chrome)
- iPad
- A few Android tablets
4. Different File Formats
Try common and less common video types:
- MP4 (most common)
- MOV (iPhone default)
- AVI (older format)
- WebM
💡 Tip: Use Chrome DevTools’ Network tab to simulate slow or unstable connections. It’s a great way to test your uploader without actually disconnecting your Wi-Fi.

Best Practices
Before finishing up, here are a few tips to make your mobile uploader work better and feel smoother for students.
1. Validate Files on the Client Side
Check the file size and type before starting the upload. This helps save data and gives instant feedback if the file isn’t supported.
2. Provide Clear Feedback
Show estimated time and upload speed so students know what’s happening.
3. Handle Edge Cases
Plan for things like the browser tab closing, the phone going to sleep, or the app running in the background, so that uploads recover gracefully.
4. Test on Real Devices
Always test your uploader on actual mobile devices under different network conditions. Desktop browsers don’t accurately simulate mobile behaviour, especially when switching networks or using background uploads.
5. Use Helpful Error Messages
Avoid vague messages like “Upload failed.” Instead, guide students, for example, suggest checking their connection or trying again after compressing the video.
Common Pitfalls to Avoid
Here are simple things to watch out for so your uploader stays reliable on mobile.
1. Not warning about mobile data
If a student is on cellular, warn them before a big upload so they don’t burn their data.
2. Leaving uploads running or listeners active
Cancel uploads and remove event listeners when they’re no longer needed.
3. Poor Progress Feedback
Update progress frequently but not excessively. Filestack’s progress callbacks are already optimised, but avoid additional heavy operations in the progress handler:
4. Ignoring Mobile Safari Quirks
Mobile Safari has specific behaviours around file uploads and background tasks. Test thoroughly on iOS devices, especially for:
- File picker behaviour
- Background upload continuation
- Memory management with large files
Conclusion
Building a good mobile uploader for student video projects isn’t just about transferring files. It’s about saving students’ time, reducing stress, and making sure tech problems don’t get in the way of learning.
By using upload tools like Filestack, you can create an uploader that:
- Handles large video files easily
- Recovers automatically if the connection drops
- Shows clear, real-time progress updates
- Works smoothly on mobile devices
- Requires minimal code to implement
The best upload experience is the one students don’t even notice; it just works, even when the Wi-Fi isn’t great or the deadline is close.
You can start with the examples in this guide, test carefully on real phones and tablets, and improve them based on student feedback.
Because every minute a student spends struggling with uploads is time taken away from learning, keep it simple, reliable, and seamless.
About the Author
Shefali Jangid is a web developer, technical writer, and content creator with a love for building intuitive tools and resources for developers.
She writes about web development, shares practical coding tips on her blog shefali.dev, and creates projects that make developers’ lives easier.